Handmade Greeting Cards: A Step-by-Step Guide to Creating Personalized Masterpieces
Are you tired of giving generic store-bought greeting cards for special occasions? Do you want to add a personal touch to your greetings and make them truly memorable? Look no further! In this comprehensive guide, we will walk you through the process of creating stunning handmade greeting cards that will leave a lasting impression on your loved ones. Get ready to unleash your creativity and embark on a delightful journey of card-making!
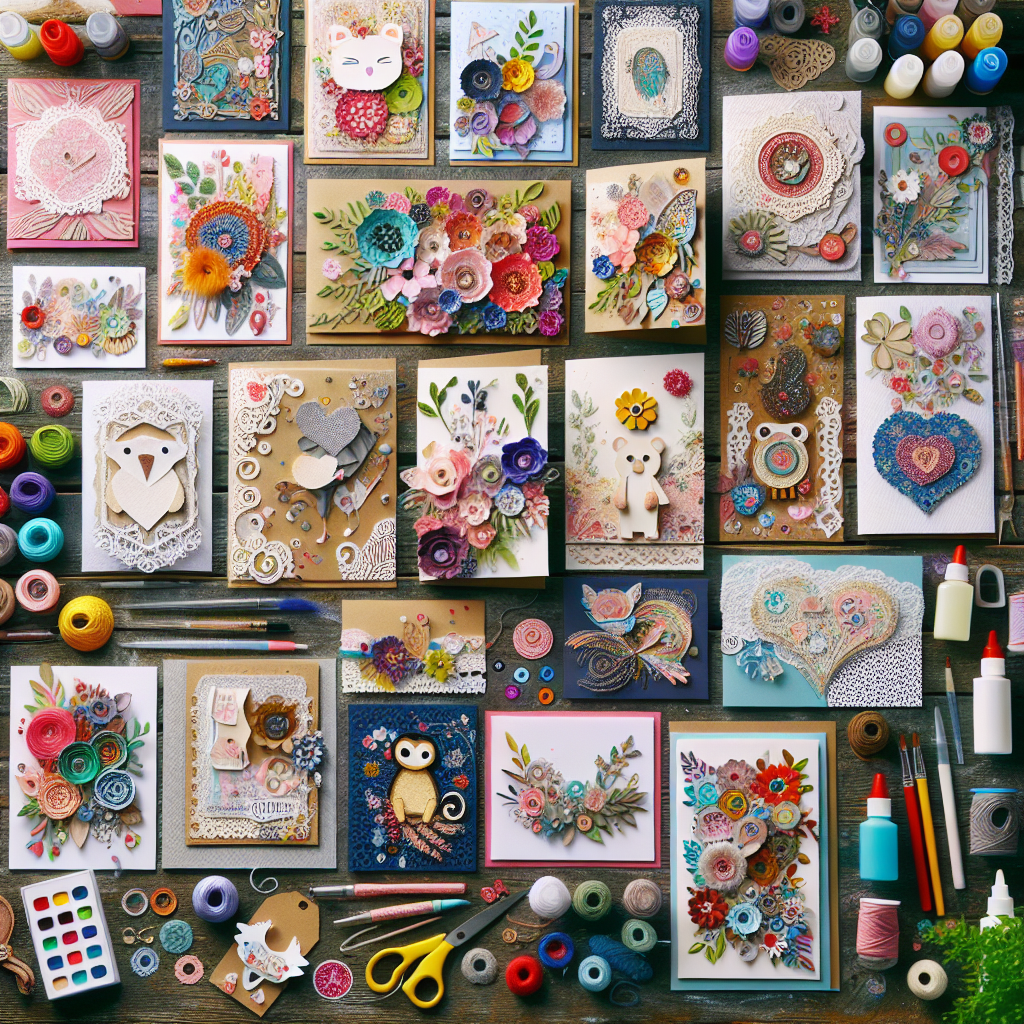
Materials You’ll Need
Before we dive into the step-by-step instructions, let’s gather all the materials you’ll need to create your handmade greeting cards:
- Cardstock or blank cards
- Decorative paper or patterned scrapbook paper
- Scissors
- Glue stick or double-sided tape
- Ruler
- Pencil
- Markers, colored pencils, or watercolor paints
- Stamps, stickers, or embellishments (optional)
- Envelope (if not using pre-made blank cards)
Now that you have all your materials ready, let’s get started on creating your very own handmade greeting cards!
Step 1: Choose a Design and Theme
The first step in creating a handmade greeting card is to decide on a design and theme. Think about the occasion or the person you are making the card for. Is it a birthday, anniversary, or a holiday? Consider their interests, hobbies, or favorite colors to personalize the card further.
Once you have a design and theme in mind, sketch out a rough layout on a piece of scrap paper. This will serve as your guide as you assemble the card.
Step 2: Prepare the Card Base
If you’re using cardstock, fold it in half to create a traditional card shape. If you prefer a different size or shape, use a ruler and pencil to mark the dimensions on the cardstock and cut it accordingly. Alternatively, you can use pre-made blank cards for convenience.
Step 3: Cut and Arrange Decorative Paper
Now it’s time to add some flair to your card! Take your decorative paper or patterned scrapbook paper and cut it into shapes or strips that complement your chosen design. You can create borders, frames, or even intricate cut-out designs.
Arrange the cut-out pieces on the front of your card base until you are satisfied with the placement. Once you have the desired arrangement, use a glue stick or double-sided tape to secure the decorative paper onto the card.
Step 4: Add Personalized Messages
A heartfelt message can make a greeting card truly special. Use your markers, colored pencils, or watercolor paints to write a personalized message inside the card. You can also print out a message on a separate piece of paper and glue it inside.
If you’re feeling adventurous, try your hand at calligraphy or hand-lettering to add an extra touch of elegance to your message.
Step 5: Embellish and Decorate
Now it’s time to let your creativity shine! Add stamps, stickers, or other embellishments that complement your chosen design and theme. You can also use ribbons, buttons, or glitter to add texture and sparkle to your card.
Remember to keep the recipient in mind when choosing embellishments. For example, if you’re making a card for a nature lover, consider adding pressed flowers or leaves as a unique and personalized touch.
Step 6: Finishing Touches
Before you call it a day, take a moment to review your handmade greeting card. Make sure all the elements are securely attached and that the card looks visually appealing.
If you’re using a blank card, don’t forget to write the recipient’s name on the envelope and seal it with a sticker or wax seal for an added touch of elegance.
Step 7: Admire Your Masterpiece
Congratulations! You have successfully created a beautiful handmade greeting card. Take a moment to admire your masterpiece and imagine the joy it will bring to the recipient.
Remember, the beauty of handmade cards lies in their uniqueness and personal touch. Each card you create will be one-of-a-kind, making it a truly special gift.
Conclusion
Handmade greeting cards are a wonderful way to show your loved ones that you care. By following this step-by-step guide, you can create personalized masterpieces that will leave a lasting impression.
Remember to choose a design and theme, prepare the card base, cut and arrange decorative paper, add personalized messages, embellish and decorate, and add the finishing touches. With a little bit of creativity and effort, you can create stunning handmade greeting cards that will be cherished for years to come.
So, what are you waiting for? Gather your materials, unleash your creativity, and start making your own handmade greeting cards today!


